The web is a content medium, and great photography is the easiest way to make a deep and lasting impression on users.
We always urge our clients to build their websites around well-shot, original photography. Sure, we can use stock images, but finding appropriate imagery among the mountain of possibilities is a hassle and can end up being just as expensive as hiring a professional photographer. With so many people using stock photography for the web, an easy way to set yourself apart is by using unique photography that can tell the story of who you are and build trust and confidence in you instead of just some faceless concept. It works a lot better than a generic handshake photo, I promise.
But getting good source imagery for the web has been a pretty consistent problem that I’ve noticed from many of our clients. For clients, it’s not your fault. We realize that you have your own business to run and becoming a master of photography and Photoshop is not really in the cards for most of you. That’s one of the reasons you’ve enlisted our help. But it’s also important to realize that unique photography is a huge part of conveying who you are through the web, and that’s a story that no one can tell but you.
Whether you opt to hire a photographer or shoot images yourself, you’ll want to keep a few guidelines in mind when creating images for the web. I’ve assembled a primer from the problems I see most frequently to serve as an introduction.
The Roles of Photography
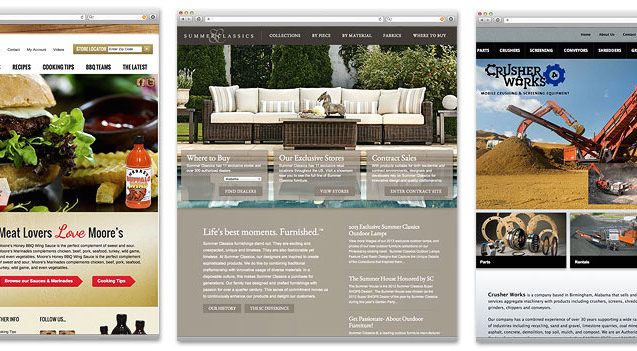
Photography typically has three main roles on a website: feature images, product images, and content images. Usually, when we ask for photo resources at the start of a project, we’re asking for feature images. The other two are typically images that are added to the site by our clients through the CMS later on in the development phase. We’ll get to those later, but for now let’s address feature images.
Feature images are large, hi-resolution images that play a major role in the look of the site. For a catalog, these may be a large lifestyle shots. For a business, they may be photos that illustrate your area of expertise. For a manufacturer, they may be a photos of your premiere products. These are arguably the most important images on on your site, and many times they’re what the look of the site is built around. Feature images are typically used on the front page of your site and serve as a first impression for many of your visitors.

Many people use stock photography for feature images, but this is the area where professional photography will have the greatest impact. I can assure you that professional photography will be worth the investment, but if you can’t afford a professional shoot, ask around for help. Most people know a friend or relative who is an amateur photographer in some sense and itching to put their fancy lenses to use.
When shooting or buying feature photography for the web, you almost always want horizontal images. Feature images are typically applied to the web with the desktop view in mind, which is in most cases a widescreen landscape orientation. With ever-wider monitors, having enough horizontal background space is often an issue. When in doubt, look for images with a central focus and plenty of breathing room on the edges.
If you’re planning on shooting new photography for your website, we’re always here to help. We can provide art direction at the onset of the project that will ensure that your photography matches the concept for your site. This is one area where a bit of early planning and investment will return tremendous dividends in the final site.
Cropping
One of the main limitations we have in creating feature images for a website is that the source images are already cropped. This isn’t just a problem with user-supplied images; stock photography is just as bad about it.
It’s easy to understand why. We’ve all had decades of training to reinforce the idea that what you see in a viewfinder is what you’ll see printed in your photo album or hanging on your wall. But when photographing for the web, especially for feature images, it’s important to remember that you’re creating a source image, not the final format.
It’s also important to remember that image manipulation is a one-way street. You can always crop a photo later, but you can’t zoom it out. And you can always make an image lower-resolution, but you can’t increase the resolution of a low-res image. The level of information is fixed when you take the picture, so make sure you’re shooting at a high-resolution and including plenty of background in the image to ensure flexibility when adding it to the site. It’s a much better problem to have too much than it is not enough.
Image Files & Delivery
Use .jpg format for all photography and export files with as little compression as possible. For feature images and product images, we prefer 300 DPI files sized at around 2500 pixels wide or higher if possible. For content images, count on around half of that size at 72 DPI. If you’re unsure what size your image files are, both Mac and PCs will let you know in their right-click menus.
When transferring files around, it’s best to create a folder of raw images and upload them to a cloud service like Dropbox. This way, you can send a URL and not several hundred megabytes of data. Avoid embedding photos into other files like PDFs and Word docs, and definitely don’t email them. Most email services have bandwidth limits that are easily encountered when sending large files, and some will even corrupt the file attachments. Use the cloud. It is your friend.
Product Photography
Good product photography is a make-or-break for catalog sites. While many large resellers have vendor photo assets at their disposal, smaller sites too often suffer from poor and inconsistent photography. I advise professional photography if you specialize in a small set of permanent products or refresh items seasonally, but if not, this is one area where learning to do it yourself can save you money and allow the flexibility of being able to add new products without outside help.
This is whole topic in itself, and one we’ll address in full in a later post, but here are some introductory guidelines:
Invest in a white background setup
White background images have become a standard on the web. They create a uniform appearance that keeps pages of assorted product images from looking cluttered and junky. There are several starter kits for this setup available online, but you can piece one together yourself with a little ingenuity and determination.
Use fill lighting
The best photography usually comes from even, natural lighting. While overheads illuminate the product, they also cast hard shadows that are distracting. Use a few small fill lights to create an even lighting environment. These don’t have to be expensive. I’ve found that 2 or 3 $10 clip lights work great.
Think square
While you’re probably selling products that vary in size and shape, these products will be displayed in a grid on the web. This means that the image proportions need to be uniform, regardless of the product dimensions. To accomodate the greatest variety of product types, it’s usually best to create square images. This is where the white background comes in handy, because while the image may be square, the product will appear isolated on the page.
Be consistent
Regardless of whether you do it yourself or hire a photographer, the focus should be on uniformity of images. This means finding an environment and lighting setup that can be easily replicated down the road, so that when you add products, the new will blend seamlessly with the old.
Sorry, but you’re gonna need Photoshop.
Basic image manipulation has become a necessary skill for web content providers. Don’t worry, you don’t need to learn the hard stuff. Developing basic skills with cropping, color toning, and brightness adjustments will get you where you need to go. If you’re going to do it yourself, it’s worth taking an introductory course or at least getting knee-deep in some online tutorials for a while. A little know-how with image manipulation can make a huge difference in consumer confidence and conversion rates for catalog sites.
And you won’t need a full version of Photoshop. Photoshop Elements, or something similar should provide all the tools you need at a much more reasonable price.
Staff Photography
For companies and organizations, staff photography is another fairly standard image type, and it follows many of the same guidelines as product photography. Uniformity is the key here, and you’ll want to choose a setting that can be easily replicated as staff changes occur. If your business revolves around direct service to clients (lawyers, accountants, and doctors, for instance), professionally-shot photography can make a huge difference in communicating confidence in your services and personnel over the web.
This is another area where a little art direction up front can make a world of difference in how the finished website portrays your company or organization.
Content Photography
This leaves us with content photography, and I’ve saved the easiest for last. Content images are client-supplied images that display alongside the page content. These images are typically snapshots used for photo galleries and to enrich the content of standard text pages. Think of these in the same way you would think of Facebook images, because they behave in a similar way:
- If it looks good on your screen, then it ought to be good enough. In this case, the way you’re viewing images is the way they’ll be viewed by your users too.
- These images probably won’t be altered or cropped, so you can use all the standard rules you’ve absorbed from point-and-shoot photography. What you see in the viewfinder will be the final format.
- These images are fluid and impermanent. None of these images are set in stone, and you’ll always be able to add to or change them in the CMS.
While this primer only scratches the surface of the many details and considerations of producing photography for the web, I hope it gives a better level of understanding for those who have felt lost amongst the technical details. The web is a content medium, and great photography is the easiest way to make a deep and lasting impression on users.
Image used courtesy of the Library of Congress.